If you’re fixing a GFI outlet at home, ensure safety with these steps. First, turn off power. Next, note line/load sides before disconnecting. Take care documenting wiring. Connect new outlet wires properly. Use a GFI tester to ensure proper function after installing. Remember to test periodically for safety. Troubleshoot by inspecting cover and wiring for damage. Secure the cover and test the outlet buttons. Replace faulty outlets promptly for safety. Master these steps for a successful DIY repair.
Understanding GFI Outlets
When dealing with GFI outlets, it is crucial to understand their function and importance in maintaining electrical safety in your home. Ground Fault Circuit Interrupter (GFCI) outlets are designed to protect you from electrical shocks by quickly shutting off power when they detect a ground fault or imbalance in the electrical current. This is especially critical in areas where water is present, such as kitchens, bathrooms, and outdoor spaces.
GFI outlets work by constantly monitoring the flow of electricity between the hot and neutral wires. If there is even a slight difference in the current, indicating a potential leakage of electricity, the GFCI outlet will trip, cutting off power to the outlet and preventing electrocution. Regular outlets do not have this feature, making GFI outlets essential for areas prone to moisture.
It is important to test your GFI outlets regularly to ensure they are functioning correctly. Simply press the “test” and then the “reset” button on the outlet to make sure it trips and resets properly. If your GFI outlet is not working as it should, it may be time for repair or replacement to maintain the safety of your electrical system.
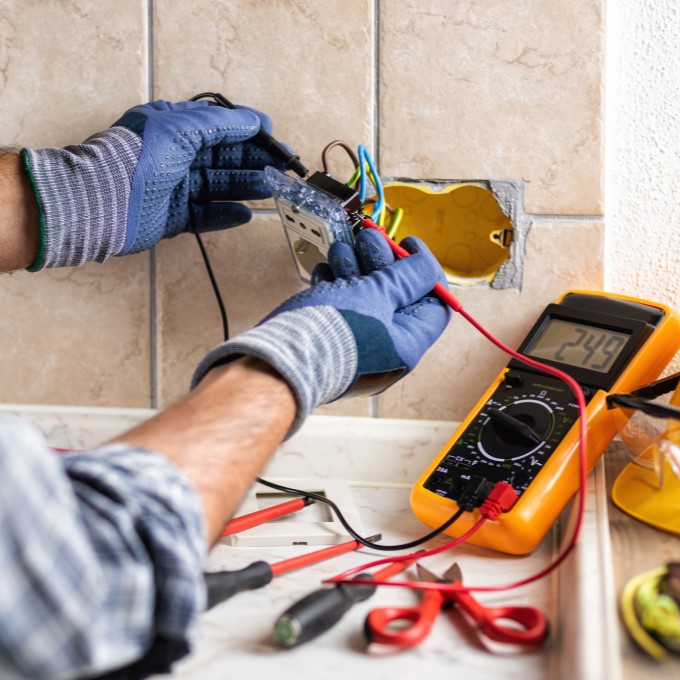
Tools Needed for Repair
To repair a GFI outlet, you will need specific tools that are essential for the task. The primary tools required include a voltage tester, a flathead screwdriver, a Phillips screwdriver, needle-nose pliers, and wire cutters/strippers.
The voltage tester is crucial for ensuring that the power is off before starting any work on the outlet. It helps prevent electric shocks and ensures safety during the repair process. The flathead screwdriver is used to remove the outlet cover plate, while the Phillips screwdriver is needed to detach the outlet from the electrical box.
Needle-nose pliers are handy for bending and manipulating wires, especially in tight spaces. Wire cutters or wire strippers are necessary for cutting and stripping the wires to the appropriate length for connection to the new outlet.
Having these tools readily available will make the repair process smoother and more efficient, ensuring that you can safely and effectively replace your GFI outlet.
Steps to Replace a GFI Outlet
Begin by carefully disconnecting the power supply to the GFI outlet before proceeding with the replacement process. Use a voltage tester to ensure the power is off. Next, unscrew the faceplate and outlet from the electrical box. Take note of the current wiring setup; typically, GFI outlets have a line side (where power comes in) and a load side (where power goes out to other outlets).
After documenting the wiring, disconnect the wires from the old GFI outlet. Connect the wires to the new GFI outlet in the same configuration. Usually, the black wire connects to the brass screw, the white wire connects to the silver screw, and the bare copper wire connects to the green screw for grounding.
Once the wires are securely connected, carefully tuck them back into the electrical box. Screw the new GFI outlet into place and attach the faceplate. Turn the power back on and test the outlet using a GFI tester to ensure it is functioning correctly.
Testing the GFI Outlet
For effective testing of the GFI outlet, ensure the power is turned off before proceeding. Begin by pressing the “Reset” button on the GFI outlet to reset it. Then, plug in a lamp or a small appliance into the outlet. Turn on the power and ensure the device is working. Next, press the “Test” button on the GFI outlet. The device you plugged in should turn off immediately, indicating that the GFI outlet is functioning correctly. Press the “Reset” button again to turn the outlet back on. If the device does not turn off when pressing the “Test” button, the GFI outlet may be faulty and should be replaced. Make sure to test the GFI outlet periodically to ensure ongoing safety in your home. Remember, safety is paramount when working with electrical outlets, so always proceed with caution and consider contacting a professional if you are unsure about any steps.
Troubleshooting Common Issues
When troubleshooting common issues with GFI outlets, start by checking for any visible signs of damage or wear on the outlet cover. Ensure that the outlet cover is securely in place and that there are no cracks or breaks that could indicate internal damage. Next, test the outlet by pressing the “Test” and “Reset” buttons to see if they function correctly. If the GFI outlet does not reset or test properly, it may indicate a wiring fault or a tripped circuit. In such cases, turn off the power to the outlet at the circuit breaker and inspect the wiring connections for any loose or damaged wires. Tighten any loose connections and replace any damaged wires before resetting the outlet. If the GFI outlet continues to trip or have issues after checking the wiring, it may be necessary to replace the outlet entirely to ensure proper functionality and safety in your home.